Tuesday, March 29, 2011

Jo's Girls

A week ago Sunday Jo Nicholson brought the girls (Chloe and Lucy) into the studio for some photos. We had some fun and got some pretty good photos:


Nikon D3, AF Nikkor 80-200mm f/2.8 @80mm, f/8 at 1/100, ISO 250


Lightroom 3 Publish Services

I'm finding Lightroom's Publish Services very useful for managing photo portfolios on the web and devices. I never imagined the Hard Drive publishing could be so useful - as soon as any change is made to an image in a Publish Folder it will move to an unpublished state so that you know to re-publish - very cool.

Check out this Terry White tutorial on publishing for iDevices. The only thing I'd add to his advice is regarding the iPad. Instead of using his recommendation of 1024x768 at 72ppi, I'd recommend exporting at 2048x1536 at 132ppi. 132 is the resolution of the iPad screen and doubling the pixel dimensions will give you some room to magnify the image. I can't confirm that this is optimal for iPhone 4, but it works well for iPhone 3.

Sunday, March 27, 2011

Trisha/Marilyn #1, Processing Series


Model Trisha Bradshaw had the idea to make some pictures as a modern Marilyn  Monroe, borrowing makeup styles from the early 60s.  I decided to go fairly flat with the lighting to match the style of the day.  The processing here is aims to look like a 1950s Technicolor still.  The processing steps were Lightroom 3 to adjust color and apply typical portrait retouching, Photoshop CS5 to do minor pixel retouching and adjust levels, Nik Vivenza to boost brightness and contrast, lower structure and saturation, Nik Sharpener Pro RAW to boost eyes and mouth crispness, Nik Define to reduce noise, Nik Color Efex Pro to add the CSI Miami glow.  This picture served as the basis for the


One of the new Nik Silver Efex Pro 2 presets, Film Noir 1, was the starting point.


The 60s Ektacolor Pro look I was able to dial into the Nik Color Efex Pro Film Effects tool.


Back to Nik Silver Efex Pro 2, I'm still trying to get the hang of the selective color feature, which is very powerful.

Finally, Susan showed me a portrait of Taylor Swift that was on the cover of Parade Magazine that was sepia toned with color lips and asked me whether I could to the same.  The selective color tool in Nik Silver Efex Pro 2 makes the processing relatively easy.  The processing emulates Polaroid P/N film.

Technical
Camera: Nikon D700
Lens: AF Micro-Nikkor 105mm f/2.8 D
Exposure: ISO 100, f/7.1 @ 1/60s, Flash WB, RAW
Lighting: Broncolor, main light small Chimera Super Pro, hair light snoot
Support: Gitzo Basalt tripod w/Acratech GP head and RRS L-bracket
Location: Grand Center Artists' Studios
Dates: Capture - March 19, 2011, Processed - March 27, 2011
Processing: Lightroom 3.3, Photoshop CS5, Nik HDR Efex, Nik Silver Efex Pro, Nik Color Efex Pro

Sunday, March 13, 2011

Portrait Theory: Single Light


Photographic portraits that aim to emulate classical paintings are usually made with a single light source.  Complexity and nuance are enhanced by using flags and reflectors to shape the light.  This portrait of model Trisha Bradshaw was lit by a single Calumet Quattro beauty dish with a shower cap diffuser.

A new find for me, LightingDiagrams.com, provides an online tool for creating, you guessed it, lighting diagrams.  I thought I'd give it a try for this series.


The Quattro is angled to skim the gray ultra-suede background.  A mirror opposite the main light and behind Trisha creates the rim lighting.  A black foam core square behind Trisha flags the background and adds a geometric element.  The camera, a Nikon D700 and 105mm lens, is about six feet away, angled very slightly up.

Not that Trisha needs it, but this style of lighting has a slimming effect on the face because the shadow side is toward the camera and the rim light adds to the 3D illusion.

Saturday, March 12, 2011

Portrait Theory: Main Light

What do these portraits have in common?

Rembrandt self portrait

Rembrandt self portrait


Al Pacino by Irving Penn


Boy Bitten by a Lizard, Caravaggio


Gary Cooper by Edward Steichen


There are seveal common elements here. First, did you notice that the light souce is to the sitter's right? I recently read a study that claims more than 75% of portraits are made with the main light to the left of the subject. My own less formal browsing definitely agrees. Why is this?

One theory I find intriguing is that most painters, like the rest of the population, are right handed. If the main light is a window, then having the canvas lit from the left avoids a shadow cast by the painter's hand. Rembrandt used a mirror for his self portrait, so the mirror image geometry fits the theory, too. By the time photography was on the scene, portraits lit from the right looked the most natural. Subjects lit from the left seem to convey a different emotional impact due entirely to a convention dictated by 600 year old practical concerns.

Another thing to note is the the light source is broad, yet directional, as if coming from a window slightly higher than the subject. The nose shadow does not cross the lip line. The contrast from lit side to shadow side is fairly sharp, which helps delineate form and reinforce overall design.

So, a classical portrait has a main light with these characteristics:
  • The sitter is lit from the right
  • The light source is slightly higher than the subject
  • The light quality is fairly contrasty, like North window light
  • In gneral, the main light is the only light on the subject
  • The nose shadow never crosses the lip line
  • Highlights in the eyes are symmetrical
These are the main light "rules" to be broken, and of course, they frequently are with great success. The point point is that the classical main light rules yeild the most natural looking portraity. Moving the main to a different position usually introduces a new tension and increases drama. For instance, moving the main light high and to the left creates a new classic, the beauty shot, like this Ricard Avedon portrait of Liz Taylor:


Moving the light low and to the left is yet another classic I like to call "Frankenstein Light":


The position of the main light conveys a great deal of nuance, so it one the many tools available to the portrait photographer.

Portrait Theory: Lens Selection


After reading several articles in a row, like Ken Rockwell's March 2008 article, "Portrait Lenses", I found myself fearful that good information about classical photographic portrait technique technique is being drowned by voices high in search ranking but low on education and skill.  I belive that the classical foundations are critical to producing consistent, top caliber work.  It is easy to demonstrate that portrait masters like Irving PennYousef Karsh and Arnold Newman used the classical portrait techniques as the point of departure for their work.

What is the ideal classical portrait?  Like it or not, the ideal that challenges us all, even photographers, are paintings like Leonardo DaVinci's Mona Lisa.  I don't think it is a surprise that the most famous painting in the world is a portrait.  We are hard wired to recognize and appreciate every nuance of the human face.  Furthermore, we have the ability to detect even the slightest asymetry or distortion, ad adaptation that helps us choose healthy mates.  Classical portraiture, whether painting, sculpture or photography, aims at simultaneously capturing an accurate likeness and idealizing the sitter.  This balancing act is mastered by only a few artists in each generation, so it must be very difficult.  At least, there are rules of geometry that guide the way, which is the topic I plan to cover here in the next few posts.

So, the first order of business for a photographer is to choose a suitable portrait lens.  The rule of thumb criteria for this is well established and nothing like Rockwell's 15 foot theory.  Perspective is extremely important to making a pleasing portrait.  Perspective is determined by the camera to subject distance.  Most of use believe that the ideal camera to portrait subject distance to 5-7 feet and that the lens focal length should be twice normal focal length of the capture format, where the normal focal length is defined as the diagonal of the capture format.  For example, the full frame DSLR diagonal is 43mm.  Therefore, the ideal head and shoulders portrait focal length is 86mm.  It is therefore no surprise that Nikon, Canon, Zeiss and other lens makers offer several 85mm lenses that are tuned for portraiture.  Leitz is a bit of a maverick here.  First it set the standard normal focal length for the 24x36mm format to 50mm, a few millimeters longer than theoretcal.  Continuing the trend, 90mm is the Leica portrait standard, which it holds alone.

So, what does a classical portrait look like?  Simple, classical portrait of Ernest Hemmingway is the first Karsh I ever saw in person and the power of it is still impressive.  It was shot on 4x5 film using a 14" Kodak Ektar.  This is the image most of us have of Hemmingway.


What happens when a photographer deviates from the ideal?  Given a lens focal length that fills the frame with the head and shoulders, if the camera is too close, we get an unpleasant wide angle distortion, making th nose too large, forehead bulbous and ears recede.  Arnold Newman used just this technique as a deliberate hatchet job in his famous portrait of Alfried Krupp.  The classical foundation led him to choose the "wrong" lens to momentous effect.


So, keeping with the formual that 5-7 feet yeilds an ideal perspective, we have two common variants; full lenght and extreme close-up.  To accomplish a full length shot, a normal lens is in order.   For instance, the portrait below or Max Ernst and Dorthea Tanning by Irving Penn was made on 8x10 film using a Schneider 300mm.


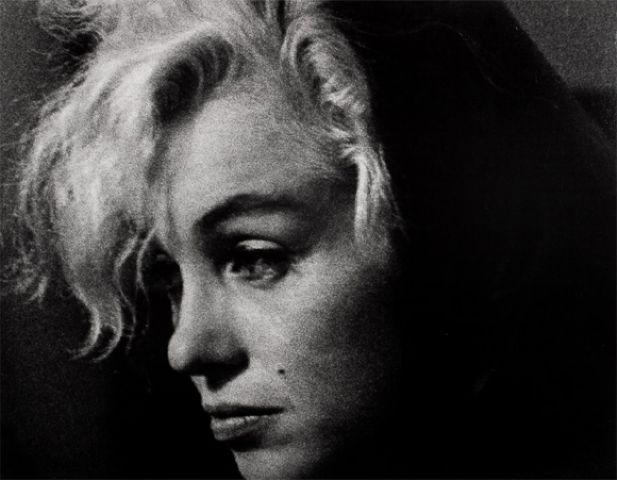
Finally, the extreme close up, which can be very powerful, but seldom flattering.  Irving Penn used a normal 80mm lens on his Rolleiflex to shoot Truman Capote.  The wider than normal perspective slightly emphasizes Capote's hands and eyeglasses.


Whereas Arnold Newman used a Leica with a 135mm lens to capture Marilyn Monroe, achieving a voyeuristic mood.  We feel like we are intruding on a private moment.


Most readers of this blog shoot a DSLR, so the table below shows the focal length recommendation for the Nikon FX and DX formats.

FX
(24mm X 36mm)
DX
(23.7mm x 15.5mm)
“Voyeur” Effect 135mm 85mm
Full Frame Head 105mm 70mm
Classical Portrait 85mm 60mm
Medium 60mm 50mm
Full Length 50mm 35mm

Saturday, March 5, 2011

Nikon D700 Noise ISO Noise Test

Digital Photo Pro just published an article, The Truth About Digital ISO, which caused me some concern, especially after I saw the Canon EOS 7D ISO Noise Test video by Tony Lorentzen which shows an erratic noise/ISO progression for that camera.  My main concern is that I'd like to shoot at wider f/stops with my studio strobes by setting my Nikon D700 at ISO 100, but not at the expense of adding noise to the degree exhibited by the Canon 7D.

To make the tests images, I made lens-cap-on shots in manual mode, f/5.6 @ 1/250s, for each possible ISO setting.  Then I processed each image in Photoshop CS5, first amplifying the noise to the max by applying auto levels, then cropping to a 3x magnification of the pixels.  If there is any noise, this technique will uncover it.  Here is my own video of he results:


I'm happy to say that shooting at ISO 100 on the D700 does not add noise at all.  In fact, the camera is noise free from ISO 100 to ISO 800.  However, shooting at any ISO other than a camera's nominal speed results in some loss of dynamic range.