Showing posts with label Portrait. Show all posts

Tuesday, March 29, 2011

Jo's Girls

A week ago Sunday Jo Nicholson brought the girls (Chloe and Lucy) into the studio for some photos. We had some fun and got some pretty good photos:


Nikon D3, AF Nikkor 80-200mm f/2.8 @80mm, f/8 at 1/100, ISO 250


Sunday, March 27, 2011

Trisha/Marilyn #1, Processing Series


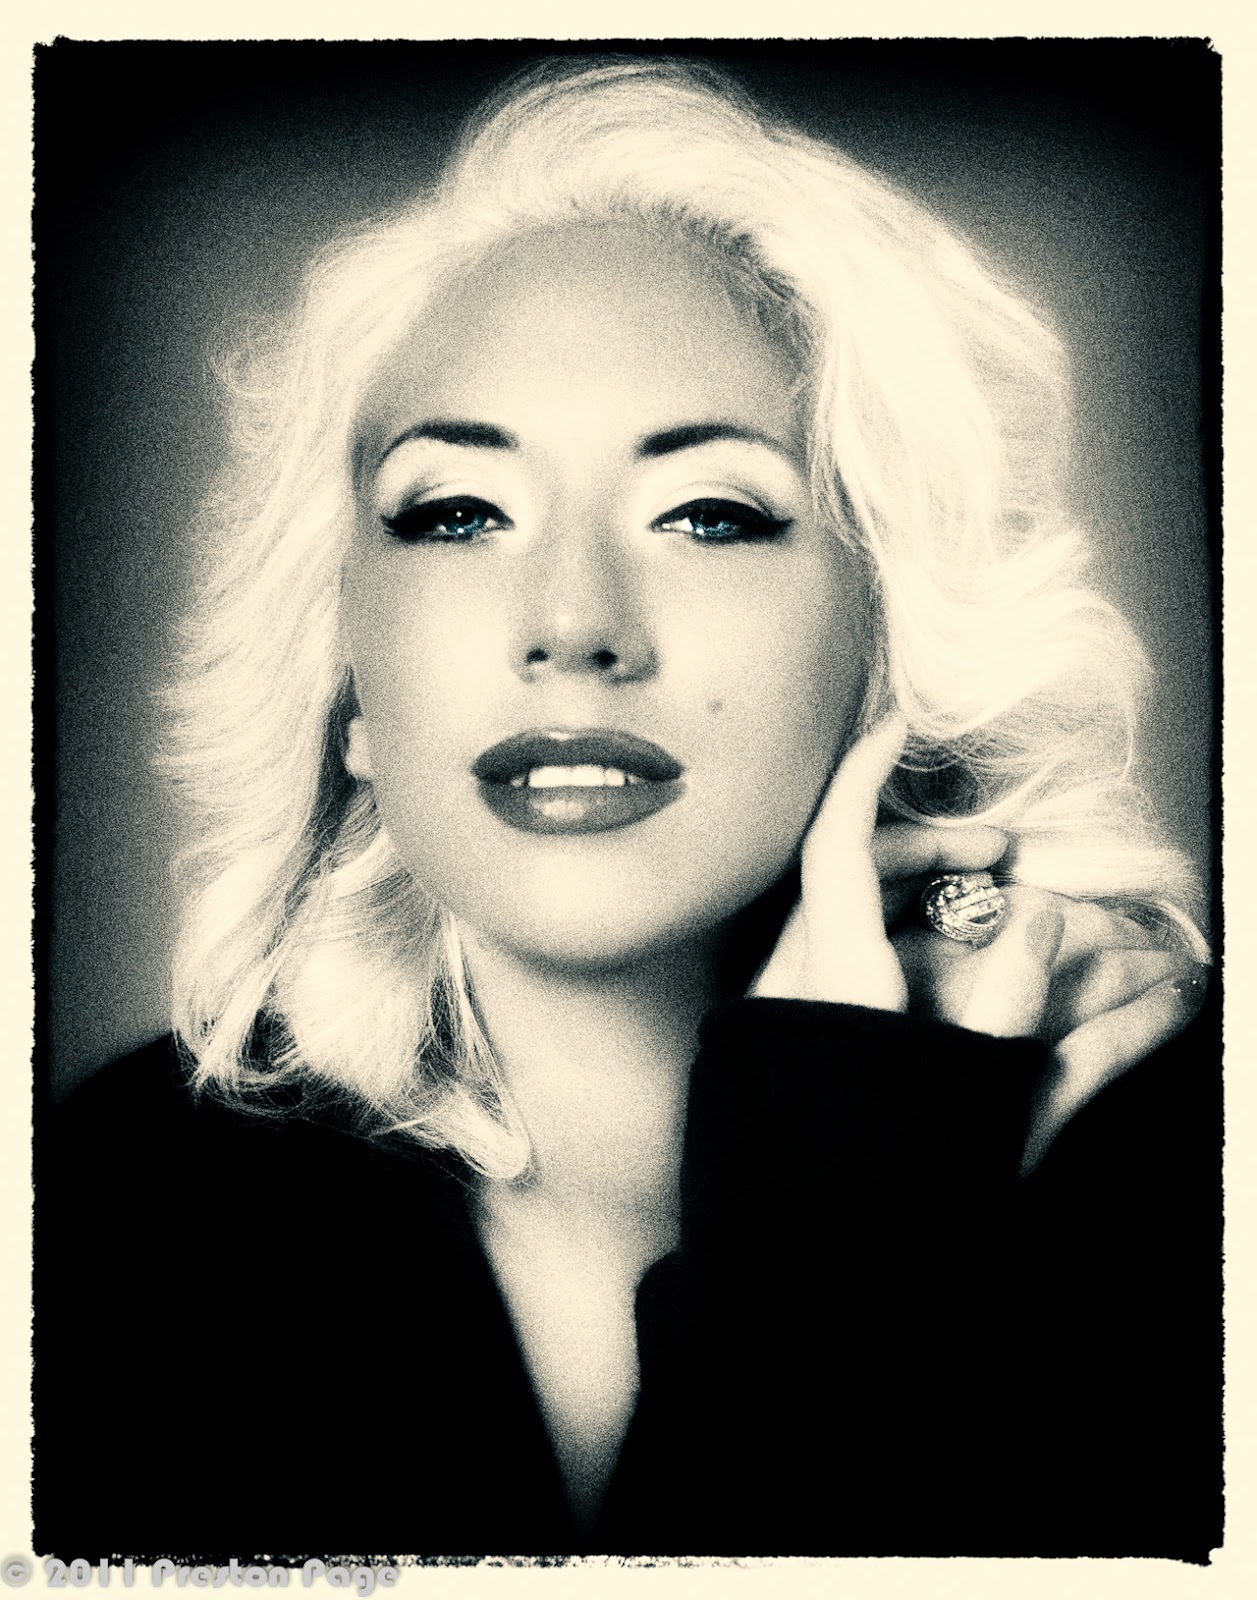
Model Trisha Bradshaw had the idea to make some pictures as a modern Marilyn  Monroe, borrowing makeup styles from the early 60s.  I decided to go fairly flat with the lighting to match the style of the day.  The processing here is aims to look like a 1950s Technicolor still.  The processing steps were Lightroom 3 to adjust color and apply typical portrait retouching, Photoshop CS5 to do minor pixel retouching and adjust levels, Nik Vivenza to boost brightness and contrast, lower structure and saturation, Nik Sharpener Pro RAW to boost eyes and mouth crispness, Nik Define to reduce noise, Nik Color Efex Pro to add the CSI Miami glow.  This picture served as the basis for the


One of the new Nik Silver Efex Pro 2 presets, Film Noir 1, was the starting point.


The 60s Ektacolor Pro look I was able to dial into the Nik Color Efex Pro Film Effects tool.


Back to Nik Silver Efex Pro 2, I'm still trying to get the hang of the selective color feature, which is very powerful.

Finally, Susan showed me a portrait of Taylor Swift that was on the cover of Parade Magazine that was sepia toned with color lips and asked me whether I could to the same.  The selective color tool in Nik Silver Efex Pro 2 makes the processing relatively easy.  The processing emulates Polaroid P/N film.

Technical
Camera: Nikon D700
Lens: AF Micro-Nikkor 105mm f/2.8 D
Exposure: ISO 100, f/7.1 @ 1/60s, Flash WB, RAW
Lighting: Broncolor, main light small Chimera Super Pro, hair light snoot
Support: Gitzo Basalt tripod w/Acratech GP head and RRS L-bracket
Location: Grand Center Artists' Studios
Dates: Capture - March 19, 2011, Processed - March 27, 2011
Processing: Lightroom 3.3, Photoshop CS5, Nik HDR Efex, Nik Silver Efex Pro, Nik Color Efex Pro

Saturday, March 12, 2011

Portrait Theory: Main Light

What do these portraits have in common?

Rembrandt self portrait

Rembrandt self portrait


Al Pacino by Irving Penn


Boy Bitten by a Lizard, Caravaggio


Gary Cooper by Edward Steichen


There are seveal common elements here. First, did you notice that the light souce is to the sitter's right? I recently read a study that claims more than 75% of portraits are made with the main light to the left of the subject. My own less formal browsing definitely agrees. Why is this?

One theory I find intriguing is that most painters, like the rest of the population, are right handed. If the main light is a window, then having the canvas lit from the left avoids a shadow cast by the painter's hand. Rembrandt used a mirror for his self portrait, so the mirror image geometry fits the theory, too. By the time photography was on the scene, portraits lit from the right looked the most natural. Subjects lit from the left seem to convey a different emotional impact due entirely to a convention dictated by 600 year old practical concerns.

Another thing to note is the the light source is broad, yet directional, as if coming from a window slightly higher than the subject. The nose shadow does not cross the lip line. The contrast from lit side to shadow side is fairly sharp, which helps delineate form and reinforce overall design.

So, a classical portrait has a main light with these characteristics:
  • The sitter is lit from the right
  • The light source is slightly higher than the subject
  • The light quality is fairly contrasty, like North window light
  • In gneral, the main light is the only light on the subject
  • The nose shadow never crosses the lip line
  • Highlights in the eyes are symmetrical
These are the main light "rules" to be broken, and of course, they frequently are with great success. The point point is that the classical main light rules yeild the most natural looking portraity. Moving the main to a different position usually introduces a new tension and increases drama. For instance, moving the main light high and to the left creates a new classic, the beauty shot, like this Ricard Avedon portrait of Liz Taylor:


Moving the light low and to the left is yet another classic I like to call "Frankenstein Light":


The position of the main light conveys a great deal of nuance, so it one the many tools available to the portrait photographer.

Friday, February 25, 2011

Trisha Bradshaw - 80s Portrait Variations #2


This final picture from our 2/19 shoot with model Trisha Bradshaw and makeup artist Sarah Lynn goes for Hollywood glamor, '80s style.  This monochrome was created in Nik Silver Efex Pro 2, using a new preset I made just for portraits.  Trisha's right arm, which you'll see in the shots below, didn't read quite right in this version, so I took it out with Photoshop.  The blue/sepia split tone was applied in Lightroom 3.


This is the base picture, color corrected in LightRoom 3, spotted, leveled and lens corrected in Photoshop CS5, noise reduction in Nik Dfine, treated with Nik Sharpener Pro and brightened in Nik Vivenza.


It would not be the '80s without a nod to Sarah Moon and Sheila Metzner with a Fresson image made with a custom preset in Nik Color Efex Pro.


And of course, the who can forget medium format, warm toned prints by Bruce Webber?  Nik Silver Efex Pro at work again, using the Ilford Pan-F 50, green filter and coffee toner settings.


And finally, the look of 6cm x 4.5cm Kodachrome 64 Professional and a B+W black net filter printed on Cibachrome.

I'd like to thank one more time Sarah Lynn, Trisha Bradshaw and Susan Page for lending me their talents for a few hours last Saturday.

Technical
Camera: Nikon D700
Lens: AF Micro-Nikkor 105mm f/2.8 D
Exposure: ISO 200, f/4.4 @ 1/30s, Auto WB, RAW
Lighting: Single Calumet Quattro beauty with 5500K fluorescent bulbs 
Support: Gitzo Basalt Tripod, Acratech GP head, RRS L-bracket
Location: Grand Center Artists' Studios
Dates: Capture - February 19, 2011, Processed - February 23, 2011
Processing: Lightroom 3.3, Photoshop CS5, Nik Silver Efex Pro 2, Nik Color Efex Pro

Thursday, February 24, 2011

Trisha Bradshaw - 80s Portrait Variations #1


With a slight change to the lighting and wardrobe, model Trisha Bradshaw enters the '80s with makeup by Sarah Lynn and styling by Susan Page.  The starting image is the last in this set.  This split tone monochrome was made in Nik Silver Efex Pro 2, which just released today.  I used a using K2 yellow filter, Agfa 100 film type and blue/sepia split tone.


Sheila Metzner and Sarah Moon rediscovered the Fresson printing process and gave it a resurgence in the '80s.  This was made from a preset I made in Nik Color Efex Pro starting in the film section.


Before there was "CSI Miami" there was "Miami Vice", which also added a warm glow to every scene.  This picture comes from a custom "CSI Miami" preset in Nik Color Efex Pro's Glamor Glow.


A cliche that started in the '80s was to include the edges of the film.  The effect here comes from the OnOne Photoframe Free, a Photoshop plug-in.


Another common treatment from the '80s was the practice of filing a larger opening in the enlarger carrier, which allowed printing the full frame and gave a small black smudge around the edge.  A new feature of Nik Silver Efex Pro 2 is a random frame effect.  This picture was made using a green filter, Agfa 100 film and coffee toner.


This picture is the basis for the rest.  To get to this starting point, I used this typical (for me) workflow:

  1. In Lightroom 3, balance color using X-Rite Color Checker Passport, crop, minor dodge & burn and clarity adjustments.
  2. Open in Photoshop CS5 for levels adjustment, spotting, resizing, etc.
  3. Pass through Nik Dfine in auto mode.
  4. Use Nik Viveza to adjust brightness, contrast and structure.  I lowered overall structure slightly, then pulled it back up with control points on Trisha's eyes and mouth.
  5. Back in Lightroom 3, I added some black and boosted recovery.

Technical
Camera: Nikon D700
Lens: AF Micro-Nikkor 105mm f/2.8 D
Exposure: ISO 200, f/4 @ 1/15s, Auto WB, RAW
Lighting: Single Calumet Quattro beauty with 5500K fluorescent bulbs 
Support: Gitzo Basalt Tripod, Acratech GP head, RRS L-bracket
Location: Grand Center Artists' Studios
Dates: Capture - February 19, 2011, Processed - February 23, 2011
Processing: Lightroom 3.3, Photoshop CS5, Nik Silver Efex Pro 2, Nik Color Efex Pro

Trisha Bradshaw - 70s Portrait Variations #3


This third installment of '70s style portraits with model Trisha Bradshaw and make-up by Sarah Lynn begins with a natural color shot.  The processing started in Lightroom 3 for color adjustment based on the X-Rite Color Checker Passport, using the +1 portrait square with the eye-dropper.  Lightroom also cropped, added black and reduced clarity.  In Photoshop CS5, I adjusted levels, applied lens correction and did some clone tool type spotting.  Finally, Vivenza lowered brightness, boosted contrast and control points increased structure on the eyes and mouth.


The Fresson look was made in Nik Color Efex Pro.


Finally, the monochrome was made from the top picture in Nik Silver Efex Pro, using Agfa 100 stock, a K2 filter and coffee toner.

Technical
Camera: Nikon D700
Lens: AF Micro-Nikkor 105mm f/2.8 D
Exposure: ISO 200, f/4 @ 1/13s, Auto WB, RAW
Lighting: Single Calumet Quattro beauty with 5500K fluorescent bulbs 
Support: Gitzo Basalt Tripod, Acratech GP head, RRS L-bracket
Location: Grand Center Artists' Studios
Dates: Capture - February 19, 2011, Processed - February 23, 2011
Processing: Lightroom 3.3, Photoshop CS5, Nik Silver Efex Pro, Nik Color Efex Pro

Tuesday, February 22, 2011

Trisha Bradshaw - 70s Portrait Variations #2


Leading with the Fresson print this second '70s style Hollywood portrait of model Trisha Bradshaw, with makeup by Sarah Lynn, executed in the manner of Skrebneski and David Bailey.  The top three pictures all started with the bottom shot followed by removal of the hand in Photoshop.  This picture was made with a Fresson preset I made for Color Efex Pro.


This monochrome was made in Nik Silver Efex Pro using the Agfa 400 film preset and the orange filter.


This gum print look was made in Nik Silver Efex Pro using a preset I made called "Grainy Nude".  


And finally, the straight shot after some minor clean up and levels adjustment in Photoshop CS5.

Technical
Camera: Nikon D700
Lens: AF Micro-Nikkor 105mm f/2.8 D
Exposure: ISO 200, f/4 @ 1/13s, Auto WB, RAW
Lighting: Single Calumet Quattro beauty with 5500K fluorescent bulbs 
Support: Gitzo Basalt Tripod, Acratech GP head, RRS L-bracket
Location: Grand Center Artists' Studios
Dates: Capture - February 19, 2011, Processed - February 22, 2011
Processing: Lightroom 3.3, Photoshop CS5, Nik Silver Efex Pro, Nik Color Efex Pro

Monday, February 21, 2011

Trisha Bradshaw - 70s Portrait Variations #1


Channeling the style Victor Skrebneski used in the '70s for celebrity portraits, where he dressed everyone from Bette Davis to Orson Welles in the same black turtleneck, this picture was made with my collaborators, makeup artist Sarah Lynn, model Trisha Bradshaw and stylist Susan Page.  Pulling off this seemingly simple portrait sitting was actually fairly involved.  The picture above is exactly the look we aimed for.  Nik Silver Efex Pro made the conversion based on the color picture below, and the lower left detail was removed in Photoshop CS5.


The shot above is the starting point for all the variations.  Processing involved basic Lightroom 3 workflow adjustments, like color balance, cropping and some burning in, followed by levels adjustments in Photoshop CS5.  Next came contrast and brightness fixes in Nik Vivenza and adding a touch of crispness with Nik Sharpener Pro 3.  Note Trisha's wrist and chair highlight in the lower left corner.  I kind of like the balance it brings, but can see where it would be distracting.  Any opinions?


The Fresson print look is courtesy Nik Color Efex Pro.  This might be my favorite version.


It is pretty easy to hit the button for "CSI Miami" preset I made for Nik Color Efex Pro, so I usually do just to see what it looks like.  Trisha picked up a bit of tan this trip South.


Finally, back to Silver Efex Pro to apply my "Grainy Nude" preset.  The idea is to look like a gum print, and I think it comes pretty close.

Technical
Camera: Nikon D700
Lens: AF Micro-Nikkor 105mm f/2.8 D
Exposure: ISO 200, f/4 @ 1/13s, Auto WB, RAW
Lighting: Single Calumet Quattro beauty with 5500K fluorescent bulbs 
Support: Gitzo Basalt Tripod, Acratech GP head, RRS L-bracket
Location: Grand Center Artists' Studios
Dates: Capture - February 19, 2011, Processed - February 21, 2011
Processing: Lightroom 3.3, Photoshop CS5, Nik Silver Efex Pro, Nik Color Efex Pro

Trisha Bradshaw - HDR Bond Girl Test


 This single image HDR test, starring model Trisha Bradshaw and makeup by Sarah Lynn, is an homage to the Connery-era Bond Girl.  Both Trisha and Sarah nailed the concept.  The picture got single image HDR tone mapping in Nik HDR Efex using a preset I named "Realistic Nude", followed by levels and curves adjustment in Photoshop CS5.


The first shot looked a little "catalog clean" to me, so I took it through processing in Nik Color Efex Pro to make it look like a Fresson print.  I think the grain makes the tie to the '60s stronger.


The monochrome was processed in Nik Silver Efex Pro using my "Grainy Nude" preset.

Technical
Camera: Nikon D700
Lens: AF-S Micro NIKKOR 60mm f/2.8G
Exposure: ISO 200, f/13 @ 1/60s, Daylight WB, RAW
Lighting: Single Broncolor head and small Chimera Super Pro bank
Support: Gitzo Basalt tripod w/Acratech GP head and RRS L-bracket
Location: Grand Center Artists' Studios
Dates: Capture - February 19, 2011, Processed - February 19, 2011
Processing: Lightroom 3.3, Photoshop CS5, Nik HDR Efex, Nik Silver Efex Pro, Nik Color Efex Pro

Trisha Bradshaw - The Blue Light


Starring model Trisha Bradshaw, with make-up by Sarah Lynn, this picture's processing is inspired by the haunting, innovative photography of the 1932 film, "The Blue Light", directed by the amazing Leni Riefenstahl.  There were quite a few steps involved for this picture, which used Lightroom 3, Photoshop CS5, Nik Vivenza, Nik Sharpener, Nik Dfine, Nik Color Efex Pro and finally Nik Silver Efex Pro.  


This color picture is the step before the monochrome conversion.  I find that a modified version of the Nik Color Efex Pro "Glamor Glow" effectively emulates look of film before anti-halation backing was invented.

Technical
Camera: Nikon D700
Lens: AF Micro-Nikkor 105mm f/2.8 D
Exposure: ISO 200, f/4.5 @ 1/15s, Auto WB, RAW
Lighting: 1 Calumet Quattro beauty and 1 Flashpoint bank with 5500K fluorescent lights 
Support: Gitzo Basalt Tripod, Acratech GP head, RRS L-bracket
Location: Grand Center Artists' Studios
Dates: Capture - February 19, 2011, Processed - February 20, 2011
Processing: Lightroom 3.3, Photoshop CS5, Nik Silver Efex Pro

Friday, November 26, 2010

Meg HDR Portrait Test #1


In the early 1970's I worked for a time at Todd Studios in St. Louis.  Part of my job was to fill print orders from a massive library of glass plate negatives.  The experience as amazing, not just because of the invaluable hands on experience, but because I was working in a sort of time bubble using equipment that was state of the art in 1920.  One thing I took away was Todd's imaginative lighting, which had that beautiful hard/soft Steichen feel.

Over the years, commercial lighting style got very flat, epitomized by room sized banks and the ring flash.  The flat light is fast and easy, making it perfect for high volume catalog work.  It has been on my mind to do a series of portraits and figures that have that Roaring Twenties feel.

This picture is a detail from an improvised sitting with Meg last Friday.  Meg very patiently sat rock solid still for a five exposure brackets and three position panorama.  The bracket shots were processed in Nik HDR Efex and the panorama stitched in Photoshop CS5.  I used Lightroom 3 to make the monochrome conversion and apply a sepia with blue shadows split tone to emulate Kodak Printing Out Paper that we used at Todd Studios.

Camera: Nikon D700

Lens: AF Micro-Nikkor 105mm f2.8 D
Exposure: ISO 200, f/8.0 @ 1/6s x five 1-stop brackets
Support: Gitzo Basalt tripod, Acratech GB Ball head, leveling base and nodal rail, RRS L-bracket
Lighting: Single Calumet Quattro daylight fluorescent from behind, strip mirror to fill
Location: Grand Center Artist Studios GPS
Dates: Capture - November 19, 2010, Processed - November 26, 2010
Processing: RAW in Lightroom 3, Photoshop CS5, Nik Silver Efex Pro

Saturday, August 14, 2010

Ray, Natural Light Informal Portrait


The preceding pictures of Ray were really grab shots I took while I was sitting for him.  At the end of our studio working session, Ray sat for me for a more conventional casual portrait.

Camera: Nikon D700 
Lens: AF Micro-Nikkor 105mm f2.8 D
Exposure: ISO 400, f/4.0 @ 1/60s, tripod
Lighting: Window Light
Location: Grand Center Artist Loft Studios
Processing: RAW in Lightroom 3, Photoshop CS5

Friday, August 13, 2010

Ray with Nikon D3


Ray, shooting at our Grand Center studio with his Nikon D3.  Something about the ambiance made me think, "Hasselblad and Tri-X pushed to 1000" like the good old days.  I love shooting first, then make the camera and film selection later.


Camera: Nikon D700 
Lens: AF Micro-Nikkor 105mm f2.8 D
Exposure: ISO 400, f/4.0 @ 1/25s, handheld.
Lighting: Window Light
Location: Grand Center Artist Loft Studios
Processing: RAW in Lightroom 3, Photoshop CS5, Nik Silver Efex Pro

Ray Between Shots


A shot of Ray, his face showing this time, as he was taking a short pause between shots at the studio yesterday.

Camera: Nikon D700 
Lens: AF Micro-Nikkor 105mm f2.8 D
Exposure: ISO 400, f/4.0 @ 1/60s, handheld.
Lighting: Window Light
Location: Grand Center Artist Loft Studios
Processing: RAW in Lightroom 3, Photoshop CS5, Nik Vivenza 2

Thursday, August 12, 2010

Really Right Ray with Nikon D3


This one is for you, Ray.  Every photographer needs that shot where he's become one with his gear processed as a Fresson without the embarrassment of it being a self portrait.  Not to worry, I have some shots show your face, but this one summed up the day for me. Thanks for coming out for lunch and heading to the studio today.  I had a great time and hope you did, too.  There are, of course, three fun process runners up, in my order of preference:

Bleach Bypass

Blue and Sepia Split Tone

Pseudo HDR
Can't wait to see your pix.    

Camera: Nikon D700 
Lens: AF Micro-Nikkor 105mm f2.8 D
Exposure: ISO 200, f/3.5 @ 1/8s, handheld.
Lighting: Window Light
Location: Grand Center Artist Loft Studios
Processing: RAW in Lightroom 3, Photoshop CS5, Nik ColorEfex Pro